Dnsmasq is a simple DNS and DHCP server for small networks. It resolves names from the local network according to the file /etc/hosts. Unknown name queries are forwarded and stored in the cache. The DHCP subsystem supports DHCPv4, DHCPv6, BOOTP (Bootstrap Protocol), and PXE.
Preparation for Dnsmasq
We switch to the “root” user:
sudo -i
First, we update the package sources, the operating system, in this case, an Ubuntu 20.04LTS:
apt update && apt upgrade -y && apt install net-tools vim
Identify current DNS service:
netstat -tulpen | grep 53
Disable and stop current DNS service:
systemctl disable systemd-resolved
systemctl stop systemd-resolved
Remove symbolic link and create new configuration file:
unlink /etc/resolv.conf

echo nameserver 8.8.8.8 | sudo tee /etc/resolv.conf
Command to install the new DNS service:
apt install dnsmasq
Backup configuration file:
cp /etc/dnsmasq.conf /etc/dnsmasq.conf.bak
Now we can begin configuring the new DNS/DHCP server:
vim /etc/dnsmasq.conf
Below is a minimal configuration:
# Listen on this specific port instead of the standard DNS port
# (53). Setting this to zero completely disables DNS function,
# leaving only DHCP and/or TFTP.
port=53
# Never forward plain names (without a dot or domain part)
domain-needed
# Never forward addresses in the non-routed address spaces.
bogus-priv
# By  default,  dnsmasq  will  send queries to any of the upstream
# servers it knows about and tries to favour servers to are  known
# to  be  up.  Uncommenting this forces dnsmasq to try each query
# with  each  server  strictly  in  the  order  they   appear   in
# /etc/resolv.conf
strict-order
# Set this (and domain: see below) if you want to have a domain
# automatically added to simple names in a hosts-file.
expand-hosts
# Set the domain for dnsmasq. this is optional, but if it is set, it
# does the following things.
# 1) Allows DHCP hosts to have fully qualified domain names, as long
#     as the domain part matches this setting.
# 2) Sets the "domain" DHCP option thereby potentially setting the
#    domain of all systems configured by DHCP
# 3) Provides the domain part for "expand-hosts"
#domain=thekelleys.org.uk
domain=example.com

# Set Listen address
listen-address=127.0.0.1 # Set to Server IP for network responses
Configuration as a Local DNS Server
Dnsmasq uses the file /etc/hosts for local name resolution. Therefore, it should be edited with an editor like vim and root privileges to add lines in the following manner. Here is an example:
## Local Network
## IP                  Hostname                 Alias

192.168.1.1        router                        ns1

## Router and nameserver on one IP, ns1 is an alias.

192.168.178.1     fritz.box
127.0.0.1             dnsmasq
192.168.1.2         client1                       ## Client without alias with IPv4 address
192.168.1.2         client1.admin-box    ## Client without alias with IPv4 address and domain
2001:da5::5         client1.                      ## IPv6 entry for the same client and auto-domain
Using the Dnsmasq Cache
To process all DNS queries through Dnsmasq and forward them to external DNS servers if necessary, the simplest way is to edit the file /etc/resolv.conf. This is the appropriate way for testing purposes. However, to make a persistent change in Ubuntu, we would need to adjust the configuration file under /etc/netplan/ and follow the yml syntax. It must be ensured that the local DNS server, here Dnsmasq, is entered as the first line in /etc/resolv.conf. As the next line, at least one other DNS server must be defined so that Dnsmasq can forward the queries. Example with forwarding to the DNS cache of the Fritz-Box and a public IPv6 nameserver from Google:
nameserver 127.0.0.1
nameserver 192.168.178.1
nameserver 2001:4860:4860::8888
We test the syntax of the configuration and apply the changes to the daemon with:
dnsmasq --test -C /etc/dnsmasq.conf

systemctl restart dnsmasq
We verify successful local caching at the terminal with:
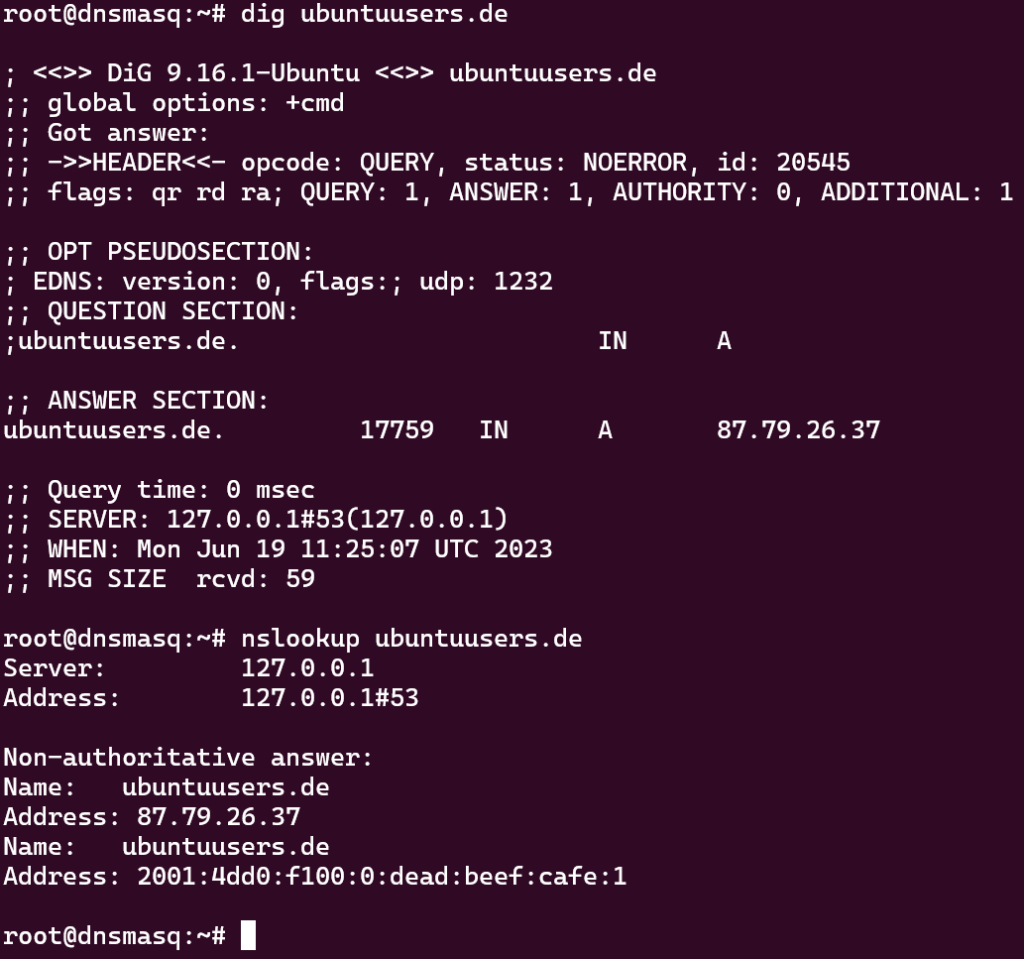
dig ubuntuusers.de

##or with:

nslookup ubuntuusers.de
Output (response from 127.0.0.1):
If Dnsmasq is really only supposed to work as a DNS server for its own computer, the configuration is already complete here.
Dnsmasq as DNS Server for Other Computers in the Local Network
If you want to use the DNS server for other computers in the local network as well, you need to let Dnsmasq listen for DNS queries on its own network interface and assign it a static IP address.
The listen specification is defined in the /etc/dnsmasq.conf. This must be edited with administrator rights, and the following lines are changed or added:
listen-address=127.0.0.1
listen-address=www.xxx.yyy.zzz
listen-address=2001:db8::34
www.xxx.yyy.zzz stands for the local static IPv4 address of the Dnsmasq computer, e.g., “192.168.178.2”. Both 127.0.0.1 and www.xxx.yyy.zzz must be specified so that Dnsmasq processes both its own and foreign queries. If the computer has multiple IP addresses, you must also specify the additional IP addresses if desired or necessary.
This also applies to IPv6. This way, you can centrally control access to the internet for an entire home network, an office, or even a larger company (see below) by manipulating responses at the DNS server.
To check if it works, you can use the command
netstat -tulpen | grep dnsmasq
We then see in the LISTEN column whether Dnsmasq is listening on 127.0.0.1 and www.xxx.yyy.zzz. In our case, Dnsmasq listens on its own local address:

Dnsmasq as a DHCP Server
To use Dnsmasq as a DHCP server, the following entries must be made in the /etc/dnsmasq.conf:
- DHCP range and lease time (lifetime of address assignment)
- Default gateway
- NTP server
- IP addresses of the DNS servers
- Subnet mask
Here is an example:
dhcp-range=192.168.178.200,192.168.178.220,24h
dhcp-option=option:router,192.168.178.1
dhcp-option=option:ntp-server,192.168.178.1
dhcp-option=option:dns-server,www.xxx.yyy.zzz
dhcp-option=option:netmask,255.255.255.0
After the change, we restart the daemon:
systemctl restart dnsmasq
Redirecting and Manipulating DNS Queries
Redirecting
Redirecting DNS queries can be useful if you are in a corporate network with its own nameserver. All sites ending with .intranet, for example, should be handled by the internal DNS server. All other names should be resolved by an external nameserver.
Under dnsmasq, it is easy to specify one or more DNS servers for different name areas. We enter the corresponding lines in the file /etc/dnsmasq.conf:
server=/intranet/10.17.1.1
This entry would send all DNS queries for the top-level domain .intranet, such as sites like firmenportal.intranet, to the server 10.17.1.1. All other queries, e.g., to ubuntuusers.de, would be handled by the nameserver entered in the file /etc/resolv.conf. This also works with IPv6 addresses.
Manipulating
There are various reasons why you might want to manipulate DNS queries. One area of application is hiding advertisements or protecting privacy. The approach here is that of a blacklist. This means that you have to maintain a list of addresses you want to redirect or manipulate. This can also be done through appropriate records in the hosts file.
For example, you might want to prevent access to Facebook and the display of Like buttons. To do this, you enter the following two lines in the file /etc/dnsmasq.conf:
address=/facebook.com/127.0.0.1
address=/fbcdn.net/127.0.0.1
and then restart dnsmasq:
systemctl restart dnsmasq
This will manipulate all DNS queries for facebook.com, fbcdn.net (the Facebook Content Delivery Network), and their subdomains (e.g., www.facebook.com) so that the queries are redirected to the local computer. There, they run into a dead end.
Advertising networks (e.g., Double Click) and analytics services (e.g., Google Analytics) can be kept out of your network in the same way:
address=/doubleclick.net/127.0.0.1
address=/google-analytics.com/127.0.0.1
The advantage of this solution is a central location where the filter rules are applied. As long as every computer in the network uses this DNS server, there is no need for each user to install an ad blocker in every browser on every computer in the network.
However, the disadvantage is the manual effort, as the blacklist is not automatically maintained. Additionally, access to, for example, Facebook cannot be prevented if the IP is used directly to access the website.
To ensure that DNS queries are not further resolved, e.g., internal domains like .localnet or fritz.box, you can configure this in the /etc/dnsmasq.conf as follows:
local=/localnet/
local=/fritz.box/
All DNS queries to *.localnet or *.fritz.box are only evaluated based on the /etc/hosts and do not leave the computer. This can also be done for the reverse areas of private IPv4 and IPv6 addresses.
local=/10.in-addr.arpa/
#ensures that the queries of the PTR records for 10.0.0./8 never go to other DNS servers

local=/d.f.ip6.arpa/
#as above, but for IPv6 and the network fd00::/8
Start / Stop / Check / Enable Dnsmasq with Root Privileges
Restart:
sudo systemctl restart dnsmasq
Stop:
sudo systemctl stop dnsmasq
Show status:
sudo systemctl status dnsmasq
Run Dnsmasq at system startup:
sudo systemctl enable dnsmasq
If we can also support you in setting up your own Dnsmasq server or the managed hosting of a Dnsmasq server, please feel free to contact us.
You can find more interesting articles in our blog, or continue with the next Linux post.