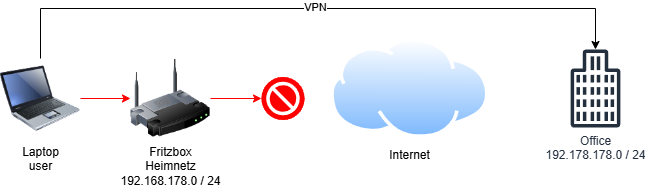
When companies use OPNsense or similar solutions as a firewall and OpenVPN for remote access, they often encounter a common issue: the internal company network uses the same subnet as the employees’ home networks-for example, the widely used 192.168.178.0/24 subnet found on many FritzBox routers. In this scenario, the VPN client cannot reach the company servers because the packets get “stuck” in the home network and do not pass through the VPN tunnel to the company.
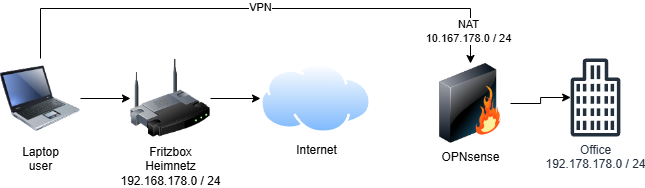
This blog post demonstrates how to elegantly solve this problem using OPNsense and 1:1 NAT (One-to-One Network Address Translation). With this approach, both the internal company network and the employees’ home networks remain unchanged, and users are granted seamless VPN access even when the networks are identical.
The Problem: Overlapping IP Networks with VPN Access
Many home routers use default subnets such as 192.168.178.0/24. If the company network uses the same subnet, routing conflicts arise when establishing an OpenVPN connection: the client tries to reach servers in the company network, but the packets are routed locally within the home network and never reach the VPN gateway.
Typical Example:
- Home network: 192.168.178.0/24 (FritzBox)
- Company network: 192.168.178.0/24 (Servers)
- The user connects via VPN, but packets destined for 192.168.178.x remain trapped in the home network.
The Solution: 1:1 NAT on OPNsense
With 1:1 NAT on OPNsense, you can translate the IP addresses of the company network into a different, unused address range for VPN users. This means users do not access 192.168.178.x over the VPN, but instead, for example, 10.168.178.x. OPNsense handles the address translation and ensures that packets are correctly forwarded to the company servers.
Advantages:
- No conflicts due to identical subnets
- Transparent access for users
- Centralized control and security via OPNsense
Step-by-Step Guide: 1:1 NAT with OPNsense and OpenVPN
1. Plan Your Networks
Choose three different networks:
| Description | Subnet | Note |
| VPN Network | 10.10.11.0 / 24 | Must differ from LAN, NAT network, and home networks |
| NAT Network | 10.168.178.0 / 24 | NAT network not used by clients’ home networks |
| LAN Network | 192.168.178.0 / 24 | Network where the company servers are located |
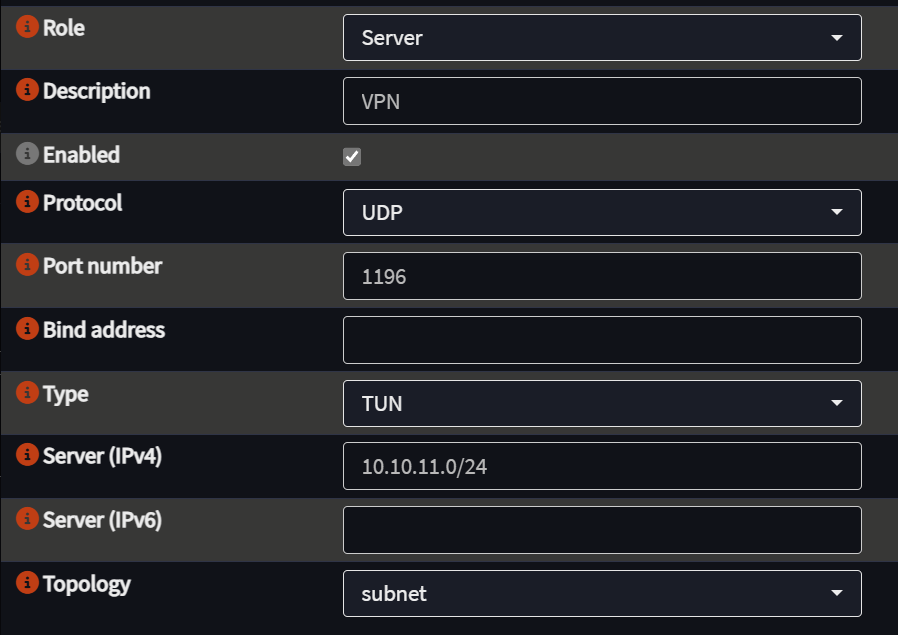
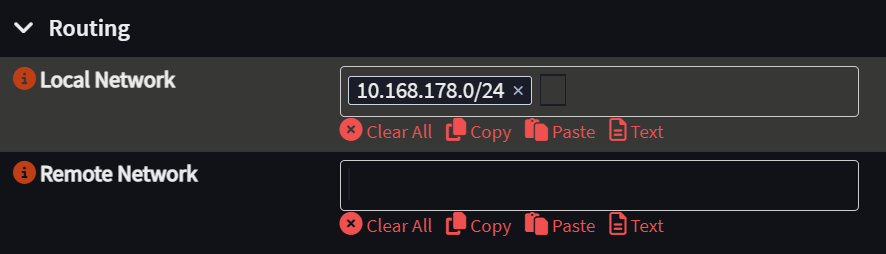
2. Configure OpenVPN in Routing Mode
- Ensure OpenVPN is running in TUN mode and the topology is set to “subnet.”
- Enter the VPN network defined above.
- Specify the NAT network as the Local Network in the server configuration under Routing.
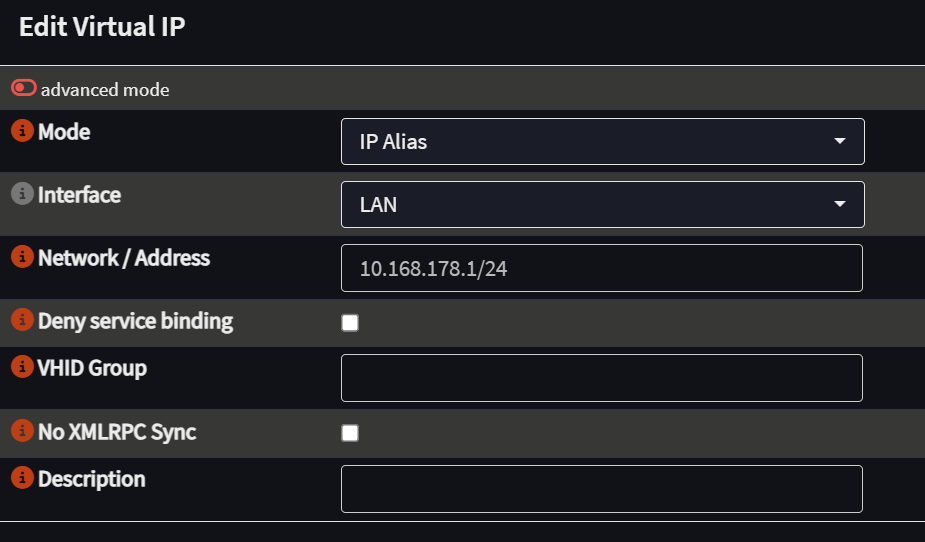
3. Set Up a Virtual IP on OPNsense
- Create a virtual IP from the NAT network on the LAN interface.
Important: Use the first usable IP in the subnet, e.g., 10.168.178.1/24.
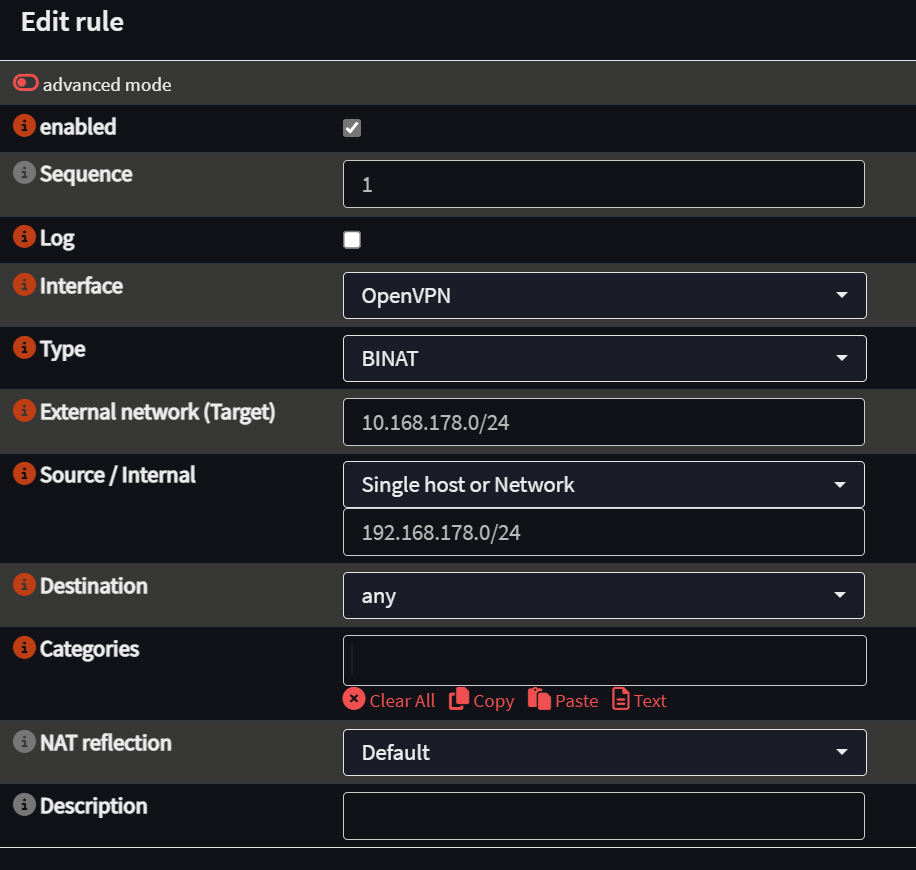
4. Create a 1:1 NAT Rule
- Navigate to Firewall > NAT > One-to-One.
- Select the OpenVPN interface (or the corresponding OpenVPN interface).
- Type: BINAT (bidirectional NAT).
- External Network: the NAT network.
- Source/Internal: the LAN network.
- Destination: any.
5. Adjust Firewall Rules
- Allow traffic between VPN, NAT network, and LAN.
- To begin, you can set permissive rules and restrict them as needed later.
Conclusion: OPNsense and VPN – Flexible Access Despite Identical Networks
Using 1:1 NAT on OPNsense provides an elegant solution for overlapping IP ranges when accessing a VPN. Users can securely and transparently access company servers regardless of their home network configuration-without complex client setups or network restructuring. This method is especially valuable for organizations with many home office users and standardized home networks.
Tip: Plan your subnets carefully and test the configuration with different home networks to ensure maximum compatibility.
We are happy to support you with your OPNsense firewall, whether for analysis, migration, configuration, or troubleshooting. Feel free to explore our services on our homepage and check out our other blog posts on firewalls. For any further questions, please do not hesitate to contact us.

quick problem solving through many years of experience