Nextcloud is a powerful, self-hosted cloud solution that is perfect for your Synology NAS. In this post, we will show you how to install Nextcloud using Docker on your Synology NAS.
Preparation: Create Folder Structure
First, we need to create the necessary folder structure on your NAS:
/docker/projects/nextcloud/docker/nextcloud/config/docker/nextcloud/database
These folders will be used for the Docker project, the Nextcloud configuration, and the database.
Create Docker Project
Now we set up the Docker project:
- Open the Container Manager on your Synology NAS
- Click on “Create Project”
- Enter “nextcloud” as the project name
- Select the path
/docker/projects/nextcloud - Select “Create Docker Compose” as the source
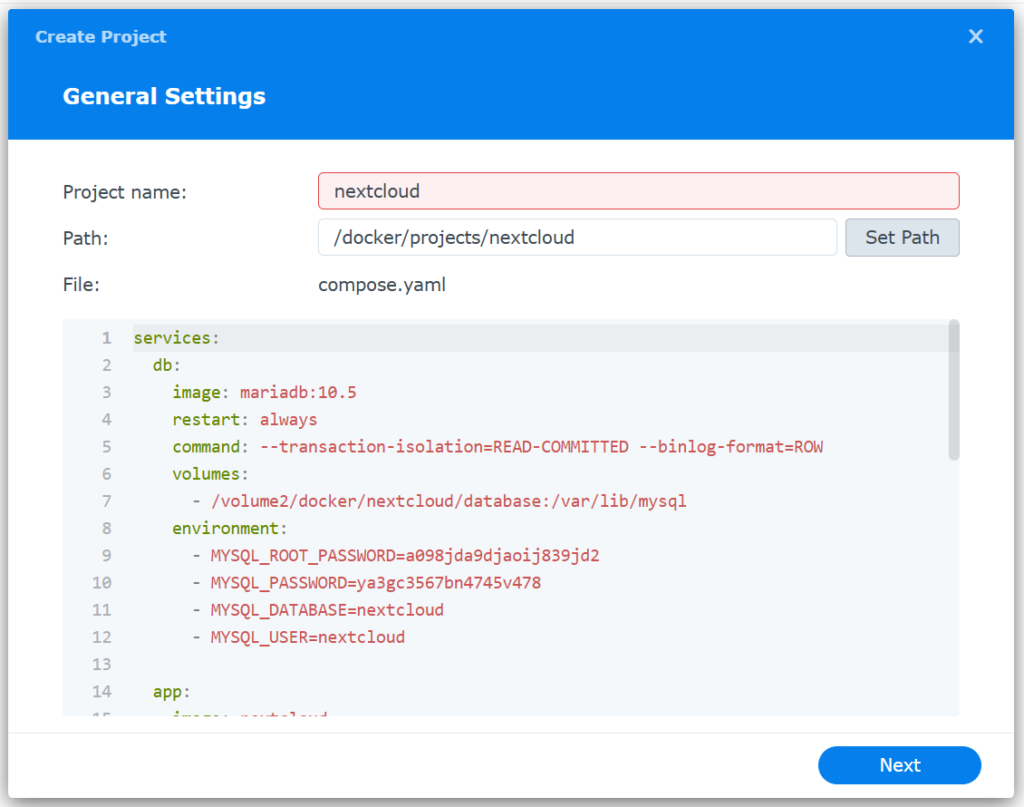
services:
  db:
    image: mariadb:10.7
    restart: always
    command: --transaction-isolation=READ-COMMITTED --binlog-format=ROW
    volumes:
      - /volume2/docker/nextcloud/database:/var/lib/mysql
    environment:
      - MYSQL_ROOT_PASSWORD=change_password
      - MYSQL_PASSWORD=nextcloud_change_password
      - MYSQL_DATABASE=nextcloud
      - MYSQL_USER=nextcloud

  app:
    image: nextcloud
    restart: always
    ports:
      - change_local_port:80
    links:
      - db
    volumes:
      - /volume2/docker/nextcloud/config:/var/www/html
    environment:
      - MYSQL_PASSWORD=nextcloud_change_password
      - MYSQL_DATABASE=nextcloud
      - MYSQL_USER=nextcloud
      - MYSQL_HOST=db
Note: Please remember to change the passwords and the local port for Nextcloud!
Start Project
- Start the project in the Container Manager
- Wait until both containers (Nextcloud and database) are fully up and running
- Check the logs – you should see a message that the containers are ready
Set Up Nextcloud
Now you can set up Nextcloud via your web browser:
- Open a browser and enter the IP address of your Synology NAS followed by the configured port (e.g.
http://192.168.1.100:8080) - You will now see the Nextcloud setup page
- Create an admin account
- Click on “Install”
Complete Installation
The installation may take some time depending on system performance:
- In our tests, the installation took between 5 and 15 minutes
- Note that limited RAM and installation on an HDD instead of an SSD can affect speed
Once the installation is complete, you can log in with your admin account and configure Nextcloud to your liking.
Tips
If Nextcloud is to sit behind a reverse proxy, various adjustments need to be made, which depend on the reverse proxy.
In the config.php, we had to add the following values via docker exec in our test:
 'trusted_domains' =>
  array (
    0 => 'localIP:8080',
    1 => 'cloud.example.com',
  ),
  'overwrite.cli.url' => 'https://cloud.example.com',
  'overwriteprotocol' => 'https',
With these steps, you have successfully installed Nextcloud on your Synology NAS. Enjoy your self-hosted cloud solution with full control over your data!
If you have any questions or would like a consultation, feel free to contact us.
For more information about Synology systems and how we use them, visit our website.
Or visit our blog for more interesting and helpful articles.

Project Manager, Lead Dev